Wednesday, 4 May 2011

CourseWork 2 Web space management system

Introduction

This blog post will detail how the coursework of the webspace management system was created and explaining all of its features. The system will consist of 3 main pages: the login page, the mainpage and a registration screen.

Here is the explaination given to us on what we should do.


Coursework Task

Write a remote Web space management system suitable for handling Web site content of various types. It should allow a user to add and organise files to a personal Web area which is secured by password. Again, there will be a connected theme, to be announced in lecture time.

This program should include the following features.


1)  Your program should be written as PHP scripts . The user should be able to work with this program via a Web browser from any computer connected to the Internet.

    2)  When your program starts, it should ask the user to enter a password and username, and not allow the user to access their Web space unless they know the password. Passwords should be stored in an appropriate MySQL database.
   
    3)  Once allowed access the user should be able to:
    a)  Make and delete directories
    b)  Delete files 
    c)  Upload new files
    d)  Only be able to access their own space, which should have space limits imposed upon it.

User data and passwords should be stored in an appropriate MySQL database or file system which the PHP script can access; you must consider security implications. There are no restrictions on the style of the user interface, although you should consider ease of use and design to be issues too.


Login Page

I started off with building on the login screen created in last week’s PHP with MySQL blog post. The main improvement on the Login Screen was that an extra button was created called Register which will be used to redirect the user to the registration screen. I also gave the login screen a bit of a space theme although I am no designer this is the best I could come up with.


Apart from this new button the login form has still basically the same functionality as before using cookies for the “remember me” function  for automated logins and using sessions to remember the username when the user is redirected to the mainpage so that only his page is viewed.


Registration Screen

This page consists of three textfields in which the user will fill in the Username desired to register and the password for the user. The 3rd textfield will be used as a confirm password as most registration form are. Again the Space theme was kept throughout for consistency.


When the user has filled in all the fields the user will press the register button which will first check if all the fields are filled in, then it will check if the password and confirm password match. If they do, an SQL connect is created with the localhost server and an SQL query is sent to the server to find out if the username chosen by the user already exists. This is done by selecting all the rows from the Users table where the Username is the username inserted by the user.  If the result of the query has a row it means that the username already exists.

  
If the Username doesn’t exist the username and password chosen are inserted in the table using the “mysql_query”. After the record is inserted the program will try to create a folder on the Server with the username as the folder name. This folder will be used as the folder loaded in the mainpage when this new user is created. If the folder is created a Session is created detailing that the registration is successful and the user is redirected to the login page.


The login page is checking for a session called Successful which is only created when a registration is successful, if its value is “Yes” an alert box is shown to let the user know that the Registration was successful. This was done in this way since if the alert box is created in the registration page, it is not shown due to the page is redirected to the login page, even if the alertbox is before the redirecting in the coding.


MainPage

When this page is loaded a check for a session named Username is done to write the Welcome + username. On the page, Also the session is used to open the folder using the “opendir” function in Php, the folder where the user will upload all his files since when this is created the name of the folder is the username chosen by the user. If the session is not found, the page is redirected back to the login.


This page consist of a file input with a button to start the event, a textbox with a button to add a folder with the name inserted in the textbox, a button to go back to the previous directory if you accessed a folder inside your personal space, a logout button to go back to the login screen, and a list of all the files and folders inside the space of the user name with a delete button near each one to be able to delete it. Here is a detailed explanation of each feature in the main page and how it was achieved using PHP.


The feature to load the files and folders of the user is achieved by using the “is_dir” feature to know if the item loaded is a folder or a file. If it’s a folder instead of just showing just showing the name of the file, the name of the folder would be a hyper link that would call a function to show all the files inside that particular folder by sending the name of the folder and adding it to the path used to get all the files from.


To know which files and folders to show when using the “opendir” function is that the directory which is opened, is the one created when the registration was done is used by going to the main folder of the webspace. Then adding the Username to the directory, since that is the one created.


Also when showing every file and folder name a delete hypertext field is created to be used to delete the file or folder.  This hyper link sends the name of the file or folder to a function which check if it is actually a file or a folder first using the "is_dir()" and then if its a file, it deletes it using the unlink feature. If its a folder it first has to go into every file and unlink it one-by-one before deleting the directory since PHP would give an error if it tried to delete a folder which had any kind of content.


As explained before another function in the Webspace is the ability to Upload Files. This is achieved by using the file input and HTML; the user will select a file from his computer and then click the upload file button. The PHP code will check if the file size is larger than 2MB the file is not loaded an error is given. Also an error is given if the size of all the items in the folder used by the user plus the size of the file to be uploaded exceeds 10MB. I chose the limit to 10MB so that I did not need to upload a lot of files before the limit is reached and testing could be done properly. When the file is uploaded the page is reloaded using the HEADER function so an alertbox shows the user that the folder is created and it is now shown since the page is reloaded the new folder is now shown as well.


To Find out how much space is used, a function was created that will add every files' size to a variable in the main directory of the user, and then before uploading the file adding it to the size of the file that is going to be uploaded now. This is done because It could be that the file that will be uploaded now will exceed the maximum limit.


Another feature is to add new folders in the webspace. A Textbox along with button to add folder exists to make this function properly. This feature is achieved when pressing the “Add folder” button and the PHP script will take the value of the textbox and using the “mkdir” function in PHP a folder is created. Again the program checks if the folder already exists and if it does the folder is not created. After the folder is created the program uses the header so that the user will go back to the current page, so that an alertbox shows the user that the folder is created and it is now shown since the page is reloaded the new folder is now shown as well.


If the User accesses a folder inside his webspace, every item uploaded or folder created will be now inside that particular folder. Also if the user wishes to access the main folder again, he does not need to log out and log back in. The "Back to Previous Directory" will take the user up one level in the directory using the "dirname" function in PHP which gives you the directory name of where an item currently is so by giving it the current path, the directory which it will give us is the folder we need to go back to the previous directory. A validation is created so that the previous will not go further than the main screen of the specific user.


Also a very simple logout button is used to unset and destroy the sessions used in when logging in and the page is redirected back to the login page. 


In the end this is what the main page looks like.


Conclusion

After finishing everything I made sure that the website is compatible in all browsers, since I kept the CSS to a minimum, everything was the same in every browser tried (Google chrome, Firefox 4, Internet Explorer).


Although I have spent a lot of time on this coursework I still believe that a lot of improvement on features could be done such as Downloading files that one has uploaded, creating a folder offline for the user which would sync with the webspace, or having an e-mail sent to the user whenever he registers first and a feature to send him an e-mail with the password whenever he forgets it.

Also I think that some improvements on styling could be done but since I never had any styling or designing experience I tried to keep things simple.

Some limitations I have done creating this Coursework was that every page had only 1 file that had all its PHP scripts. This proved to become quite messy when fixing errors or trying to find specific code. Next time I would make sure to structure the scripts into more files for at least every main function and link them to the main page using the "include" function.

As For my Experienced when using PHP over these last few weeks, coming from .NET Developer who never did any Web Development before was, that PHP although a very powerful scripting language still leaves us some things to be desired such as a good Debugging tool and maybe its strictness over Case-sensitivity can be a little tedious.

Friday, 29 April 2011

Using MySQL with PHP

Introduction

In this blog post, we will take our PHP login page created for the previous post and build on to include functionality of MySQL databases.
The task for this week is to:

  • Log into the SQL server using the command line and perform some commands such as listing the databases
  • Attempt to connect to SQL by using PHPMYADMIN tool
  • Create a Database that stores usernames and passwords
  • Modify your PHP program from the previous lab session to connect to the database to authenticate the user. 

Log into the SQL server using the command line and perform some commands such as listing the databases

First the command line is opened by running the cmd.exe in the windows 7. To login to the MySQL server first you need to find the Bin folder located in the MySQL directory in my case “D:\xampp\mysql\bin”. To go to this directory in the command line first enter "D:" to go to the D drive and then the command “cd D:\xampp\mysql\bin” was entered.
To log into the Server you must use the following command and login as root for the first time since no other users exist (unless more users where created using XAMPP, but more on that later), The command used was : “mysql -uroot –p”. When this command is entered a prompt for the root password appears as shown belong.

As soon as one logs into mysql the path in the command line will be changed to mysql. Here is where one can run commands in the server. To show all the databases you have in the MySQL server “show databases;” command was entered with the result below.


Attempt to connect to SQL by using PHPMYADMIN tool

To login into PHPmyAdmin the Xampp homepage was logged into (by typing http://localhost). From the menu here, the PHPmyAdmin was selected. This will prompt the user to insert the login for MySQL (in this case we kept using “root”).


The phpMyAdmin is a tool build in XAMPP to automate the creation of databases and tables without the need of writing any SQL code. As one can see from the screenshot below all the databases are listed on the left, and by clicking on any one of them, you will enter in another screen that allows you to edit the particular database, and also shows all the tables that are in that database.


Create a Database that stores usernames and passwords

To Create a Database using the interface provided in phpMyAdmin is very easy. In the main page of the tool there is a textfield under “MYSQL LOCALHOST” that allows you to enter the name of the database you want to create and by clicking the “create” button the database is now created in the MySQL server.
When this button is clicked the next screen shown is to start creating tables to be used in this database, using the same concept of before, the name of the table was entered and the number of fields in the table was also entered (in this case 2). The go button will take you to the next screen. This screen is used to create the fields of the table by inserting the name, type, and primary keys etc… The Save button in the bottom of the screen will then perform the SQL command to create the table with the information given.


Once the table is created some data of usernames and passwords where entered by using an insert command in the SQL screen or the insert feature from GUI of the Tool.


Modify your PHP program from the previous lab session to connect to the database to 
authenticate the user

Once all of that was set up, it was time to change the Login screen created to incorporate the use on the MySql database.

First to connect to the database a variable with  the "mysql_connect" function was used an it was given the server name and login and password.

Then to select the database "mysql_select_db" was used to select the database.

A query was used to select all the usernames and password where the username and password are the ones inputted in the textboxes. To reduce the chances of SQL injection attacks the "sprintf(" function along with the "mysql_real_escape_string" function to pass the username and password instead of just insert them into the sql query string.

A variable is then used to store the results of the query and another variable will hold the number of rows of the result. 

If there is a row in the results then the username is confirmed to be genuine thus a Session is started to send the username to the next page and the user is now redirected to the mainpage.

In the end the SQL connection is close to reduce the usage of resources.


Thursday, 7 April 2011

PHP, the Basics

Introduction

This blog will start discussing the basics of PHP (Hypertext Pre-Processor), a free, server side scripting language that is combined with HTML. Although targeted towards Web is has its concepts and ideas similar to that of JAVA and C++, and is now one of the most popular scripting languages today.
The main reasons why PHP is so popular amongst web developers apart from the fact that it’s free is because of its high performance, its ease of learning and its comprehensive set of database access functions.


Task

In this week's exercise we were asked to:

  •  Verify that PHP is working on our web server using our browser.
  • Create an associative array of usernames and passwords and list the entire array in a table.
  • Explain in our blog the difference between the echo() and print() functions.

Verify that PHP is working on our web server using our browser.

With the XAMPP package downloaded last week, checking if PHP is working is easy. In the XAMPP homepage (http://localhost) in the menu status, XAMPP shows the status of all its services and one of them is PHP. This service needs to be activated in order for PHP to work on the web server.  Also further proof of the PHP service is running is the address being used in the web browser which is http://localhost/xampp/index.php. Since the webpage is working using a .php file then the PHP service is working.


Create an associative array of usernames and passwords and list the entire array in a table.

To script with PHP first you must create the "<?php" and "?>" open and close tags within the HTML file. Then I created an associative array “$logins” which lists all the user names and passwords.  Then to list all the items in the array in a table, I first echoed the table border that will be used and then I used a while loop to echo each username and password.


Difference between Echo and Print Functions
After some research lead me to websites such as http://www.learnphponline.com/php-basics/php-echo-vs-print the following differences could be said about both language constructs.

Even though both are used for the same operation, Echo is considered to be faster (although no considerable speed differences will be noticed during runtime) than "print" because it simply spits out HTML mark-up in its calling position within the document without returning a value unlike “print”. Print - Returns an integer value 1 for no reason.
Also "Echo" can take more than 1 parameter when used without a parentheses by using commas (","), "print" cannot have multiple expressions.

As you can see above the differences between both functions are small, the one to choose depends on ones’ likes. Choosing "echo" should be better because of performance and multiple parameters but print will always retain its nostalgia factor.


Thursday, 31 March 2011

Server Side Development

Server Side

The posts of the first 5 weeks of this blog were about client side web technologies including JavaScript, HTML, CSS and XML. Now the blog will shift towards server-side development and technologies which perform tasks by the server in the client-server model.

The basic way to describe this model is, the client will send a request to the server using the appropriate protocol (for example using the HTTP protocol on port 80 for Web Requests while using a web browser) which will then respond either with the requested item or an error. There are many server types apart from Web Servers which make use of this model. These include:
  • File Servers
  • Application Servers
  • Instant Messaging
  • Images and Sound (such as live streaming and online radio)


The 2 leading Web servers being used in today’s industry are Apache and Microsoft IIS (Internet Information Services). Now these servers usually make use of Database servers or other types of servers to add more functionality and to set up all servers needed could cause a lot of problems but fortunately there are some packages, which are open source, which group all the servers so that it will be much easier for the user to install and set up. An example of such package is XAMPP, a cross platform package (meaning it could be used on different operating systems such as Windows, Linux, MAX OS X etc…), which consists of Apache HTTP (The Web Server), MYSQL Database server, FileZilla FTP server, PHP and OpenSSL.


Task Summary

The task assigned relates to the installation and setting up of XAMPP. Here is an outline of the given tasks
  • Install XAMPP
  • Test the following function with XAMPP:
    • Control Panel
    • Check that the http and https services work
    • Check the ftp service
    • Get an XAMPP security Report
    • Get a php info report
    • Get a visitor report 
    • Test the guestbook 
  • Add an image and a style sheet to  "..\xampp\htdocs\index.html" and test it out
  • attempt to replace index.html and other files using an FTP client from another computer


Downloading and Installing XAMPP


XAMPP for Windows can be easily downloaded for free from Apache Friends. The latest version available at the time of writing and thus used for this task was 1.7.4. Once downloaded the installation wizard starts, which asks the user which services he would like to install. All the services were ticked and the installation was started. After the installation is finished, all services can be controlled from the XAMPP control panel.

Common problems with Apache Web Server

There are a couple of common problems that one could face after installing Apache:
  • Sometimes before the installation starts a message box pops up which states that due to UAC (User Account Control) some functions of XAMPP may be restricted. This is due lack of permissions the user has in the C:\Program Files. To Change the UAC settings in a Windows 7 machine go to the Control Panel à System and Security à Action Center and under Security there is the option User Account Control, click on Choose you UAC level and slide to the option “Never Notify”. The machine usually needs a restart to implement these changes.
  • Another common problem with Apache is that something may already be using port 80(HTTP) and 443(HTTPS) on the server, to solve these issues one could set the Apache server to use different ports for HTTP and HTTPS.


Testing the Functions of XAMPP

Control Panel

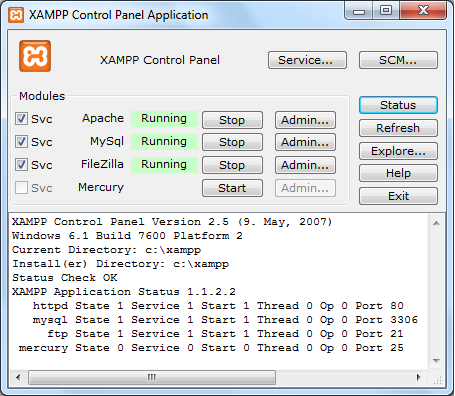
The image below shows the XAMPP control panel running on a Windows 7 machine. The Control panel shows you all the available services installed with an option to stop them at any time. Also information such as the Directory and version of the XAMPP along with any problems there are, are found in the large text field under the services. The Status button will show you all the services currently running along with the Port that they use. The explore button will take you to the folder where the XAMPP is installed (usually c:\xampp).


Check the HTTP and HTTPS services

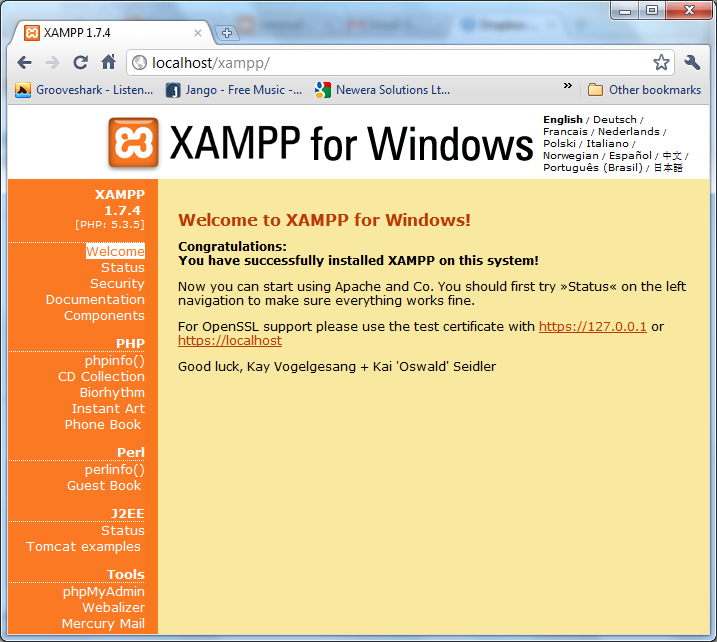
To test these 2 services is very simple. In the Control Panel the Admin button next to the Apache module takes us to the main page of the web server which in the case is a splash screen. (Alternatively one could enter http://localhost in a web-browser). This page is a welcome page which allows the user to select the language for the XAMPP. Also by opening this page one has successfully tested if the HTTP module is working properly.
To check for the HTTPS service first I checked that the service is activated in the Status page of XAMPP, then to verify one must browse the main page using https instead of http. The result of browsing the main page with the URL https://localhost/ is a security message since the certificate is not trusted.


Check the FTP service

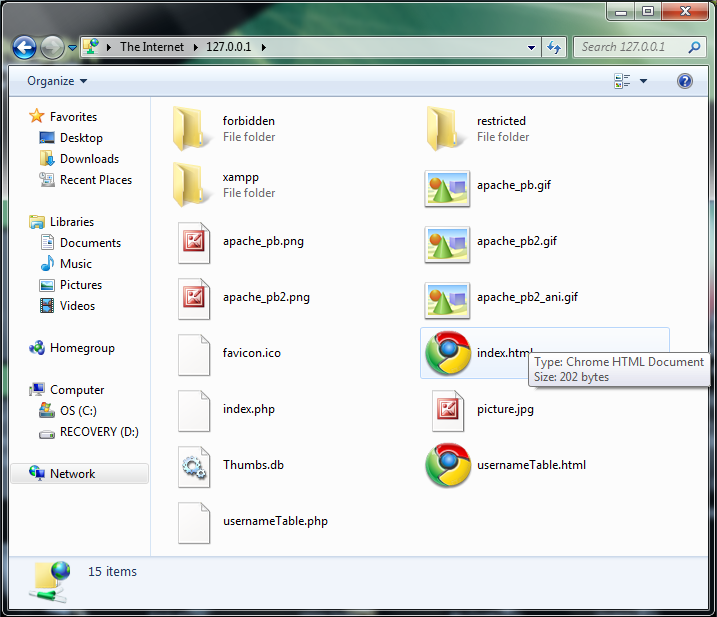
Again we go to the status page and make sure that the FTP service is enabled. To test this service we must make use of it by sending or downloading files from the server by using FileZilla FTP Server which is part of XAMPP and is already installed. By entering ftp://127.0.0.1 in the Windows Explorer the FTP server was accessed and logged into using one of the 2 default users Filezilla has when installed. After logging you could see all the files and folders which where given permission to that particular user.


Getting an XAMPP security Report

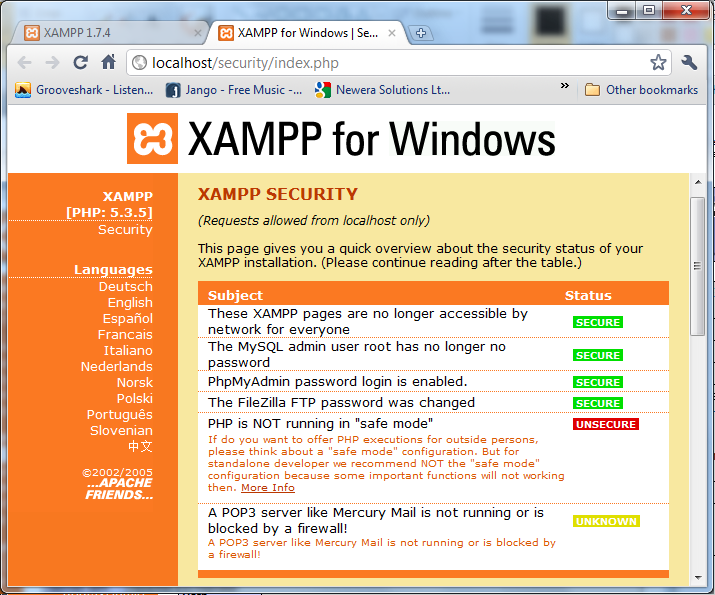
The report itself is very easy to get from the security page. At first most items are unsecured since XAMPP is defaulted to be as open as possible. To fix most of the security issues XAMPP provides with a security console which helps the user change some passwords to make some of the services more secure.
The remaining 2 items where fixed manually, The FTP password was changed from the FileZilla Server Interface and according to the Security report itself, if PHP is going to be used for development purposes its best to leave it running not in safe mode, so this security issue was left as it is.


PHP phpinfo() report

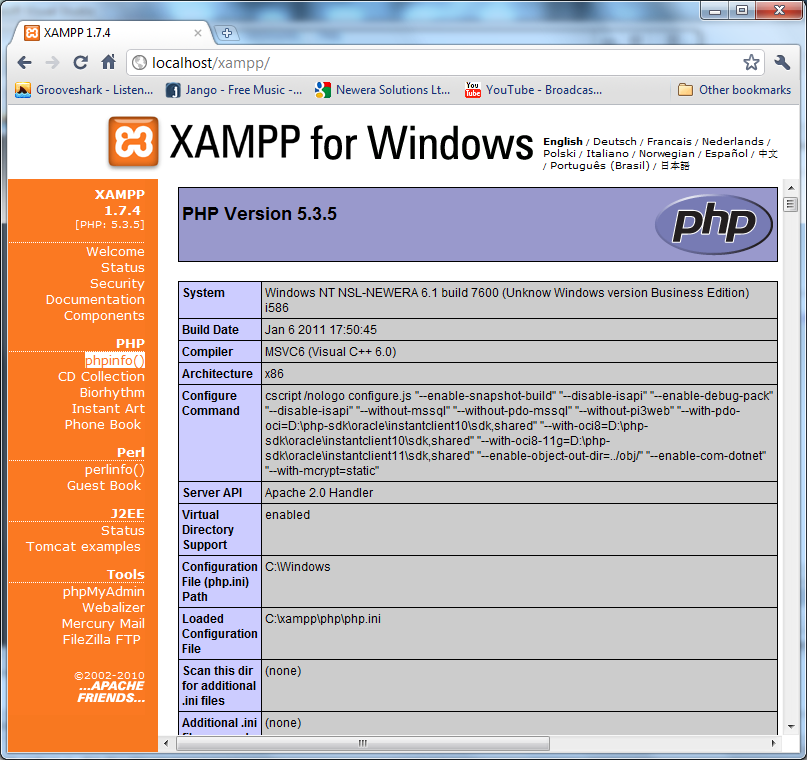
The XAMPP homepage provides the phpinfo() report which displays information regarding the PHP installation, configuration and operating environment of the server. Details include PHP version number, installed modules, predefined variables and server environment information.


Get A Visitor Report

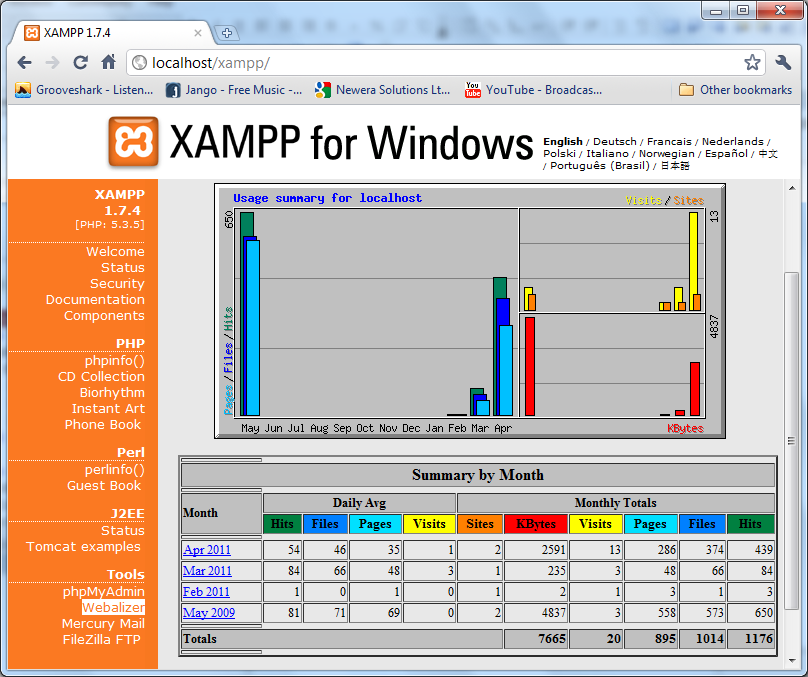
XAMPP also provides us with a tool called the Webalizer. This tool shows the number of Visits on the server at a given month in the form of a graph.


Test the guestbook 

The Guestbook can also be found in the XAMPP menu


Changing the layout and adding an image to Index.html

After Finishing with all the features of XAMPP I went to the htdocs directory to change the HTML file of the index and then access it from another machine to notice the changes, the file was easily found and very simple changes in the document using HTML and CSS where used. To view the file online from another machine I ran the ipconfig command in the command prompt of the Server to find out the exact IP. Then using a web browser in the other machine I typed in the IP followed by “/index.html”, and the changes could be viewed.

Attempt to replace index.html and other files using an FTP client from another computer

The last task required to set up the FTP server so that it could be access from another computer in the network. First through the FileZilla Server, I created a new account “Guest” with a password and the files which it can read and/or write. This user will be used to access the Server from another PC. To access the Server I typed in ftp://192.168.1.83 in the windows explorer of the other machine, but before the computer asked for a username and password to gain access and error popped up stating that no connection was being established. This was identified as being simply the Windows firewall blocking FTP connections to the machine.